
FOR ABSOLUTE BEGINNERS - LED CHASER USING PIC16F876A

The project below is for absolute beginners for people that are just starting microcontroller programming it is a led chaser that follow as regular pattern by which a led is chasing another led but the project is design to blink each bit in portB at 1 seconds interval and each bit in portc is shifted at 125ms.

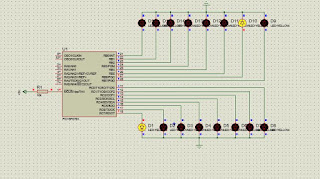
the project is simulated with proteus 8.0


//LED CHASER WITH BITWISE OPERATOR
//PROGRAMMER:AKINGUNSOLA CALEB
//FREE TO USE BY ALL
//compiler mikroc pro for pic
int lednumber[4];
int a;


void main() {
CMCON|=0x07; //disable comparator
TRISB=0x00;    //set as output
TRISC=0x00;    //set as output
PORTB=0x00;    //set all pin low
PORTC=0x00;     //set all pin low

do
{

    PORTC=1<<lednumber[0];  //start from  bit 0
     lednumber[0]++;        //increment bit
    delay_ms(125);          //wait 1 seceonds
    if(lednumber[0]>7)        //if shifting is on rc7
    {
    lednumber[0]=0;         //reset lednumber[0]
    PORTB=1<<lednumber[1];    //start from bit o
    lednumber[1]++;          //increment bit
    if(lednumber[1]>7)         //if shifting is on rb7
    {
    lednumber[1]=0;            //reset lednumber[1]
    }
    }


}while(1);

}

The above code can be ported to any microcontroller provided the correct register and syntax is been used

Comments

Popular posts from this blog

Interfacing L298N Motor Driver with Arduino Uno

1 May Interfacing L298N Motor Driver with Arduino Uno In this tutorial we will learn how to interface  L298N  motror driver with  Arduino Uno . You might be thinking why we need L298N for controlling a motor. The answer is very simple,  Arduino  board or a  microcontroller  IO pins don’t have enough current/voltage driving capability to drive a motor. For driving the motor in both directions (clockwise and anti-clockwise) we need to use an  H-Bridge . Please read our article  H-Bridge – DC Motor Driving  for more information. L298N is an integrated monolithic circuit with dual H-Bridge. It can be used to rotate the motor in both directions and to control the speed of the motor using  PWM  technique. Components Required Arduino Uno L298N Motor Driver 12V battery 2x DC Motors Jumper wires L298N Motor Driver Module L298N Motor Driver Connections Explained Specifications Output A, Output B – To connect two motors. Driver Power Input – Board can accept 5V to 35V which will act as the power

E-TECH SOLAR INVERTER SOLUTION

    DEEP CYCLE BATTERIES The reason many projects fail can mostly be put at the door step of batteries due to inadequate charging and low charge/discharge cycles. Our batteries are  among the very top 3 in the industry and capable of undergoing several cycle  of up to 5 years @ 20% DOD. Hence, we are confident of giving as much as 2 years warranty for some of our batteries SOLAR SYSTEM FOR DOMESTIC AND INDUSTRIAL USE  Many businesses such as hospitals, schools, shopping malls, hotels etc are beginning to embrace solar to completely eliminate unnecessary spending on diesels ……. why not come on board now and earn yourself some carbon credit apart from huge savings in millions of Naira.   SOLAR PANEL MODULES Our panels are carefully selected and tested from the very best among  the Tier one range of solar panels. We guarantee a sustainable yield for at least 25 years and 15 years warranty Inverter Our hybrid inverter chargers are super-powered with

Using the TLP250 Isolated MOSFET Driver

Using the TLP250 Isolated MOSFET Driver - Explanation and Example Circuits I’ve already shown how to drive an N-channel MOSFET (or even an IGBT) in both high-side and low-side configurations in a multitude of ways. I’ve also explained the principles of driving the MOSFETs in these configurations. The dedicated drivers I’ve shown so far are the TC427 and IR2110. Some people have requested me to write up on MOSFET drive using the very popular TLP250. And I’ll explain that here. The TLP250, like any driver, has an input stage, an output stage and a power supply connection. What’s special about the TLP250 is that the TLP250 is an optically isolated driver, meaning that the input and output are “optically isolated”. The isolation is optical – the input stage is an LED and the receiving output stage is light sensitive (think “photodetector”). Before delving any further, let’s look at the pin configuration and the truth table. Fig. 1 - TLP250 Pin Configuration Fig.